How To: Disable Forced Encryption on the Nexus 6 for Faster Performance
One of the more talked-about features of Google's new flagship device is the fact that all of the data on the Nexus 6 is encrypted by default. At face value, this certainly seems like an added bonus for the 6-inch phablet, especially in this day and age with growing security concerns abound. It's definitely something that the FBI is none too pleased about.But the encryption methods used in the Nexus 6 are not without their faults. Rather than using a dedicated hardware chip to perform the functions necessary for maintaining encryption, Google opted to use a software layer that handles all of the strenuous legwork. This results in decreased performance and battery life over what the device is capable of, most notably read and write speeds that are almost 3 times slower than they would be without encryption.Since there's no option in the settings for disabling encryption on the Nexus 6, developer Brandon Berhent created a modified boot.img file that will disable encryption automatically. The process is relatively simple, but decrypting the Nexus 6 means that any existing data will need to be wiped. So make sure you have everything important backed up before proceeding. Please enable JavaScript to watch this video.
RequirementsNexus 6 (this mod is not intended for use on any other device) Windows PC
Step 1: Put Your Phone into Bootloader ModeFirst up, power your Nexus 6 completely off. When the screen goes black, press and hold the Volume Down button with one finger, then press and hold the Power button with another. This will bring up Android's Bootloader menu. From here, go ahead and connect your phone to your PC using a good quality USB cable.
Step 2: Download Necessary FilesFor this method, you'll need to download two image files and the Nexus Root Toolkit. From your Windows PC, click the following links to get each of the image files:Modified boot.img file Stock userdata.img file With those downloaded, grab the Nexus Root Toolkit installer file from this link.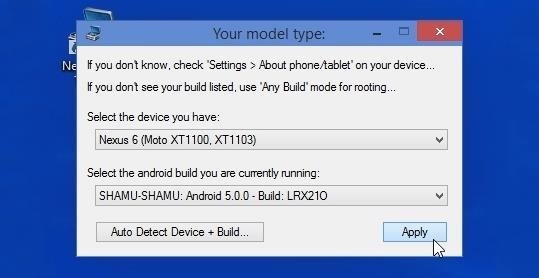
Step 3: Set Up the Nexus Root ToolkitFirst, go ahead and launch the Nexus Root Toolkit installer file that you just downloaded. Follow the prompts for installation, then NRT will ask what device you have and what Android version it's currently running. For device, go with Nexus 6, obviously. Then, select "Android 5.0.0 - Build: LRX210" as the Android version and click "Apply." Next, NRT will ask to download some additional files. Go ahead and click "Download + Update All File Dependencies." After that, you should be taken directly to the Nexus Root Toolkit's main menu. To begin, click the button labeled "Full Driver Installation Guide." From here, skip ahead to Step #3, then click the "Google Drivers" button. Follow the prompts to get all of your ADB and Fastboot drivers installed, then exit the Driver Configuration Guide.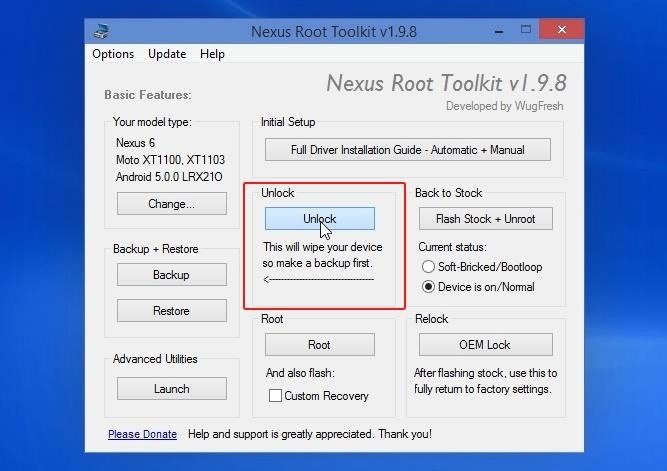
Step 4: Unlock Your BootloaderBefore you can flash the modified boot.img file that automatically decrypts your phone, you'll have to unlock your bootloader. From NRT's main menu, click the "Unlock" button in the middle of the screen. From here, click "OK" on the first popup. The second popup will ask if you're currently booted into Android—since your phone is in bootloader mode, be sure to click "No" on this dialog box. A message will pop up on your phone at this point asking if you'd like to unlock your bootloader. Make sure that "Yes" is selected, then press your phone's Power button to confirm your choice. After that, wait a few minutes for the process to complete. Your phone will boot back into Android automatically when it's finished, but don't bother going through the initial setup process just yet. Instead, put your phone into bootloader mode again by powering it off, then holding the Volume Down and Power buttons simultaneously.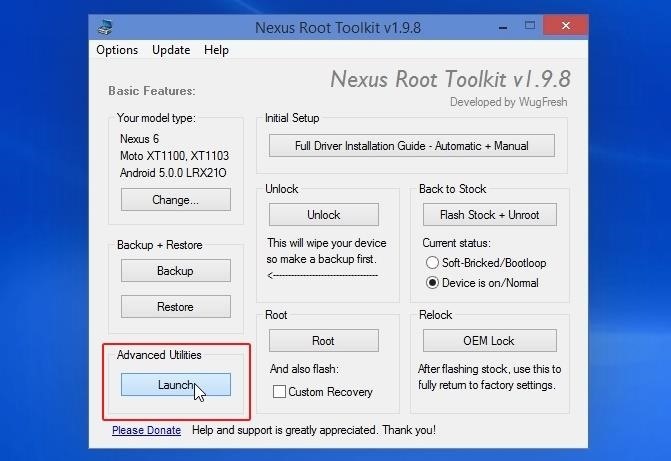
Step 5: Flash the Modified boot.img FileWith your phone back in bootloader mode and the USB cable still connected, it's time to flash the modified boot.img file that automatically disables encryption. From the Nexus Root Toolkit's main menu, click the "Launch" button under the Advanced Utilities header. From here, make sure that "Flash (Permanent)" is selected at the top of the middle column. With that done, click the "Boot" button, then press "OK" on the popup. Use the next screen to navigate to your PC's Downloads folder, then select the "boot_noforceencrypt.img" file and click "Open." The Nexus Root Toolkit will automatically flash the modified boot.img file at this point, and after a few minutes, your phone should boot back up. You'll likely encounter a screen on the phone asking you to enter a password, but ignore that and simply put your phone back into bootloader mode by powering it off, then pressing and holding the Volume Down and Power buttons simultaneously.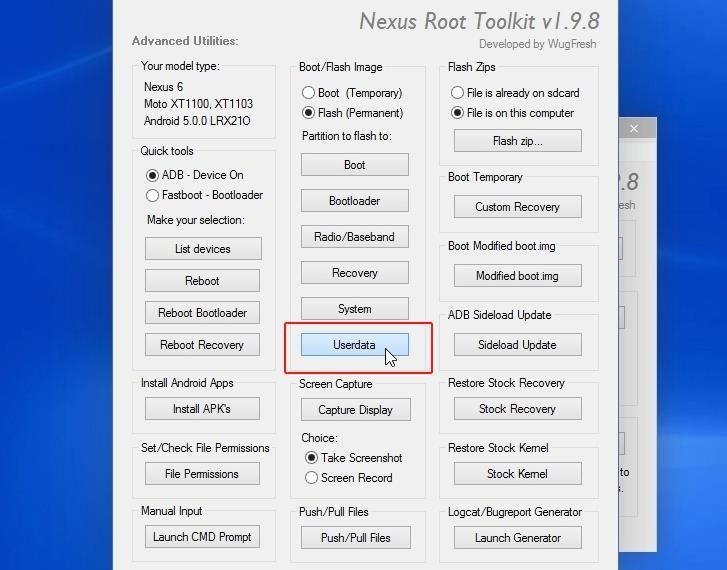
Step 6: Flash the Stock "userdata.img" File to Factory ResetWith your Nexus 6 still connected to the PC and back in bootloader mode, click the "Userdata" button in the Nexus Root Toolkit's Advanced Utilities menu, then hit "OK." From here, select the userdata.img file that you downloaded earlier, then click "Open." This will wipe all of the old encrypted data from your device, paving the way for you to start fresh without encryption. After a few minutes, your phone will boot back into Android, at which point it is safe to disconnect the USB cable.You'll have to run through initial setup again, but now your shiny new Nexus 6 should have a bit more oomph to it. Has the performance or battery life on your phone shown a noticeable improvement since you've disabled encryption? Let us know in the comment section below, or drop us a line on our Facebook and Twitter feeds.
If your email address come back as compromised, then it's time to change your passwords on all of the sites you use the same email/password combo. If not, you may be safe for now, though you could have been hacked from another site where no records were made public. Either way, you should put an end to reusing passwords.
Should You Change Your Password? Find Out If You've Been
The best use-case for this is karaoke stories, where you're singing along to the words that appear on the screen as the music plays. Of course, this means knowing what song you're going to use to begin with, so you'll have to play around to hunt for a song that supports lyrics in Instagram before actually shooting your story video.
#1 Instagram Scheduler & Social Media Platform: Later
'Space Invaders' The Board Game Celebrates 40 Years Of The Arcade Classic Forbes - Curtis Silver Space Invaders turned 40 last year, along with many of us who grew up playing it in the arcade or on our Atari systems a few years after its initial release in 1978.
How to Make your own Atari 2600 games using BASIC « Retro
XAMPP stands for Cross-Platform (X), Apache (A), MySQL (M), PHP (P) and Perl (P). It is a simple, lightweight Apache distribution that makes it extremely easy for developers to create a local web server for testing purposes. Everything you need to set up a web server - server application (Apache
Hack a Facebook Account On XAMPP/WAMP | Ethical Hacking
Blog For Latest Tips & fixes for iPhone, iPad, Apple Watch, Mac, iOS, macOS Problems. Apps, Software, accessories reviews, news, Deals, Tutorials in Video.
Binance 101: How to Install the Mobile App on Your iPhone
Protect Apps with a Secret Volume Button Code on Android
While you can login to your cellular provider's website to view your current data usage, there's an easier way built right into your iPhone. Just go to "Settings," then "Cellular," and check out your "Cellular Data Usage" to see your current period's use. More Info: How to Easily View Your iPhone's Current Cellular Data Usage
How to Easily View Your Current Cellular Data Usage on Your
Jan 31, 2015 · Once $399 A Year, Google Earth Pro Is Now Free Greg Kumparak @grg / 4 years Lots of people have dabbled with Google Earth to fly around their neighborhood or poke around a 3D version Paris.
Google Earth
How to DIY a portable handheld Nintendo 64 « Hacks, Mods
How to Change the LED color on an optical computer mouse
Remove unwanted ads, pop-ups & malware. On your Android phone or tablet, open the Chrome app . Go to a webpage. To the right of the address bar, tap More Info .
How to Stop Pop-Up Ads on an Android Phone: Say Goodbye to
0 comments:
Post a Comment